
Lower your internet bill
61% of people overpay for their internet.
Are you one of them?
Unlock exclusive offers in your area!
Call now
[tel]Enter zip code
 Use code: KALA & receive a $50 gift card with your order!
 Are you happy with your Internet service?

About the author
Wi-Fi is popping up everywhere these days: in cafes, in parks, in airports, and of course, in a majority of our homes. Many new homes now even come with Wi-Fi capabilities as a built-in feature. But most of us still don’t have unlimited wireless signal range in our homes. Sometimes our Wi-Fi network signal can fail to reach certain rooms, or even a whole side of the home.
Here are twelve strategies for how to extend your Wi-Fi signal. We’ll also explain how to troubleshoot a few common Wi-Fi connectivity problems. These tips and tricks will ensure you’re getting the best Wi-Fi service you can for your home.
Before spending your hard-earned money on new Wi-Fi equipment, make sure you’re getting the most value from the equipment you already have. Below are some ways to boost and stabilize your Wi-Fi connection and eliminate dead zones without spending a dime.
Technology can glitch out at many points, and some of them won’t originate in your home. It can be frustrating to experience a signal loss or even have your network shut down entirely. Downtime could result from a planned ISP maintenance period, software that glitched on the ISP’s end, or similar tech issues that occasionally cause trouble for home networks.
Before you potentially waste your time tearing your network apart to find a problem that might not be there, contact your ISP to see if any issues are popping up on their end. Your ISP will be able to see what’s happening on your Wi-Fi network and troubleshoot on their end. They can also send over a technician if they can’t solve your connectivity issues over the phone.
The first thing you should always do with any malfunctioning piece of computer equipment is reboot. Like all tech that relies on software, sometimes rebooting the device may solve whatever problems you’re experiencing.
Rebooting will clear out the router’s memory and allow it to install necessary updates. The simplest way to reboot your Wi-Fi router is to unplug it, wait about one minute, then plug it back in. Rebooting your router can take a long time, so you need to be patient. If your router installs an update during its reboot cycle, the entire process can take up to 10 minutes or more.
If your wireless network isn’t getting the speeds you paid for, it may not be the fault of the Wi-Fi router. The problem may be with the modem. Check your modem by plugging an ethernet cable directly from your computer into your modem’s gigabit ethernet port. Then test your internet speed.
If the modem runs fine at this point, check your router using a wired connection on both ends. Plug the modem into your router first, but also plug the router directly into your computer with another ethernet cable.
Do the speed test again like this, with your router hooked up to your computer by ethernet cable. Give the router a minute or two to connect. If the test did well with the modem but does poorly at this point, you may need to upgrade your Wi-Fi router or its firmware (see below).
If both of the wired tests come out with good speed and strength, your issue must be with the Wi-Fi signal coming from your router. Read on for how to troubleshoot your router’s Wi-Fi signal.
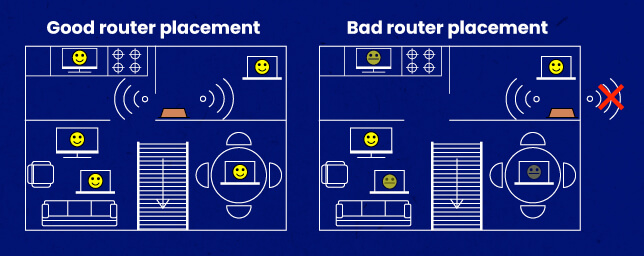
Where you physically place your router in your home can significantly impact your Wi-Fi coverage. It may look nice and neat to hide your router in a cabinet with a hole to run your cables, but doing so may hamper your Wi-Fi signal.
If you only have problems getting a signal in select areas of your home, your answer may be to simply move your router. Make sure the router is in the most central location possible.
Other nearby electronics and heavy-duty appliances can interfere with your Wi-Fi signal if they are too close to your router. To get the best signal, move your router away from all obstructions. You want to place your router in an open space.
Ideally, your router will have an uninterrupted line of sight to your device. Putting the router in an elevated area, such as a shelf, will also extend Wi-Fi coverage.
If your router comes with moveable external antennas, point them at different angles to maximize your coverage.
Another culprit of weak Wi-Fi signal or dead zones may be outdated wireless router firmware. Router manufacturers are always looking for ways to squeeze more speed from their hardware, so keep your router’s firmware current to ensure you get reliable Wi-Fi signal and speeds.
Most routers take care of updates automatically or make the process as streamlined as possible. Regardless of how tedious the process is, or even if you don’t suffer from poor Wi-Fi speeds, you will still want to update your router’s firmware to ensure improved speeds, security and added security features.
Updating your firmware is easy from your router’s admin screen, which you can access through an ISP-provided app or through an web browser. If you’ve never logged into your router before, see our extended step-by-step guide on How to Login to your Router.
QoS (Quality of Service) controls, supported by most modern routers, will let you prioritize certain apps over others.
Here’s how to change your router’s QoS settings:
Some settings may differ depending on your type of router.
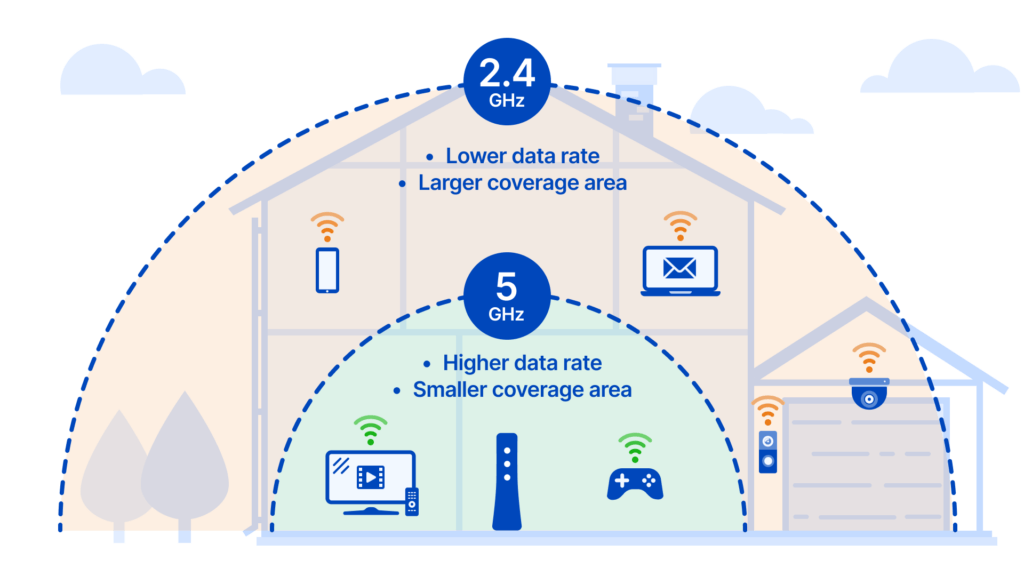
Wi-Fi routers generally support two bands (2.4GHz and 5GHz.) The 2.4GHz band is slower, but it can pass through obstructions much better than the 5GHz band. If you’re in a smaller home, such as an apartment, a 5GHz band should work perfectly. If you live in a large home or are trying to get a Wi-Fi signal outdoors, you may want to switch to the 2.4GHz band. You will sacrifice some speed, but you’ll get a much more stable connection with a signal that can more readily pass through obstacles.
Most routers manufactured today off the option to use both bands on the same network name (aka Service Set Identifier or SSID.) Login to your router, look at your router settings and look for the 5GHz option. Give the 5GHz network the same network name (SSID) and password as your 2.4GHz network. The router should automatically choose the best signal.
If your router doesn’t have this option, give your 5GHz network another SSID and password, then connect to that one manually.
Routers also come in triple band, which will give you an extra 5Ghz frequency band for more of your devices.
If you want to get really snazzy, try a Wi-Fi 6E-enabled router, which will allow you to access the 6Ghz band. Just remember that all your devices must be compatible with Wi-Fi 6E for you to realize any benefit from it.
Inside each frequency band for your Wi-Fi are smaller bands called channels. The 2.4 Ghz band has 11 channels and the 5 Ghz band has 45 channels.
If you’re experiencing interference, you could be sharing a channel with other Wi-Fi networks that use the same channel. Most routers automatically select a channel with the least congestion, but older routers will use a predetermined channel, which is rarely the best option.
Check to see if your router may be competing with other networks for the same channel. If so, you can change the channel to a less congested one. Your signal should improve significantly.
You can find out which channels are in use by going to your computer’s command prompt and entering “netsh wlan show all." This command will list out all wireless networks in your area and the channels they’re using. Alternatively, you can use a Wi-Fi analyzer to survey your existing Wi-Fi network and other nearby networks in an easier-to-read graphical format.
Channel congestion can change over time, so you want to manually check to see if your channel is more congested than before. If so, you can switch to a different channel and get a noticeable spike in Wi-Fi network performance.
If you have an open network, or if your network uses a weak password, you are almost guaranteed to have some uninvited guests taking up bandwidth on your network.
If you’re running Windows, you can use a free tool called Wireless Network Watcher to download a list of all devices on your network. There are some advanced items on the list you get back, like IP address, MAC address, etc. You can safely ignore those items and pay attention to the “Device Name" and “Network Adapter Company" columns to see which devices don’t belong on your network.
If you spot intruders and need to kick them off your network, you can go to your router’s web interface and change your network’s password. Keep in mind that once you change your network’s password, this will boot ALL of your devices from the network. If you have many smart devices you use around the house, you’ll need to update the password on every device. However, keeping your network secure is worth the relatively minor inconvenience.
The Domain Name System (or DNS) converts domain names into numbered IP addresses. Your service provider will set up your modem to use its DNS server by default, which may not give you the best performance.
Most modems will let you change your DNS address to one that is much faster. This method is the easiest way to boost Wi-Fi performance. You have many public DNS servers to choose from, including heavy hitters like Google and Cloudflare.
To find the best DNS server in your area, download and run a free Windows app called Domain Name Speed Benchmark. Once you open the app, switch over to the “Nameservers" tab, then click “Run Benchmark" Once the app finishes its process, click on the “Conclusions" tab to get your results. Once you see the best DNS server for your area, go to your modem’s settings and replace the default DNS address with the new server’s DNS address.
Even with the methods above, you will inevitably run into a situation where you will need to get rid of your current router. Sometimes, you have to purchase new equipment to boost your Wi-Fi range and use newer technology to improve Wi-Fi stability and speeds. Explore the following tools to get seamless Wi-Fi coverage in ways you can’t do with software alone.
Many Wi-Fi routers don’t have enough antennas to provide Wi-Fi coverage for large homes, making your home’s Wi-Fi signal weak. Depending on the existing router type, you may not be able to adjust the router’s settings.
Some routers don’t have antennas, so you may need to add an external Wi-Fi antenna to your router. An external Wi-Fi antenna could be as simple as a Wi-Fi repeater or as complex as a MIMO (Multiple-In Multiple-Out) system.
Many routers come with USB Wi-Fi adapters that you can use to extend the router’s signal indoors. These adapters will help provide faster internet to floors and rooms that your router may not be able to reach.
Make sure you’re also using a router that supports the latest technologies. As of this writing, IEEE 802.11ax (Wi-Fi 6) offers the fastest download and upload speeds compared to older technologies like IEEE 802.11b. Wi-Fi 6E is a variation of Wi-Fi 6 that adds the 6 Ghz frequency band, but it’s not yet as widely available and compatible as Wi-Fi 6.
When grabbing a new modem, you don’t want to just get the cheapest router available, even if it does support the latest technologies. Ensure the new router you’re buying has the range you need and all your required features. Make sure the devices you use to access your Wi-Fi network also support these updated technologies.
Using an additional wireless router, a Wi-Fi extender, or a Wi-Fi repeater extends the reach of the original signal. A Wi-Fi range extender can be easier to set up and solve the signal reach problem for you just as quickly.
Wi-Fi range extenders come in different styles. With some of these Wi-Fi extenders or Wi-Fi repeaters, all you need to do is plug them into an electrical outlet to extend the reach of your existing Wi-Fi signal.
If you need to cover a large area, however, you may need a different type of Wi-Fi extender, such as a Wi-Fi mesh network.
The best places to employ a mesh network system are areas of up to 1,000 square feet in a single- or multi-floor building. A mesh network will easily be your best option if a typical Wi-Fi extender or Wi-Fi repeater doesn’t provide the coverage you need. A mesh network is simple to set up and will significantly extend your wireless signal in no time.
Do you have a large number of connected devices in your home? Your current internet plan may not be able to cope with all of them consuming your bandwidth at once. If you’ve recently purchased more smart devices, you may need to upgrade your internet plan. Contact your internet provider and see what plans they have available.
Do you want to leave a review for AT&T Internet?
About the author
Infinity Sales Group, LLC